You’ve got your new pen. You’ve used it for a few months. And then suddenly, it’s skipping off the page, and the ink isn’t coming out smoothly.
What gives?
My best guess? Your pen is dirty. (Sorry).
Learning how to clean a fountain pen is a key part of the ownership experience. Otherwise, you’re pen gets filled with gunk or old ink and doesn’t work as well.
Let’s avoid that, shall we?
Three common types of ink pens
For anyone new to fountain pens, there are three primary types to know. While cleaning a fountain pen is pretty standard, there are some small differences across these types.
- Cartridge. The cartridge pen is the most beginner-friendly option. Insert a pre-filled ink cartridge into the pen, and you’re ready to write. This method offers convenience and ease of use, perfect for those just starting out with fountain pens.
- Converter. With a converter, use bottled ink to fill your pen. This method provides more ink color options and is more environmentally friendly. It requires a bit more skill and patience since you’ll need to draw ink into the converter using a built-in mechanism.
- Piston or eyedropper. Piston and eyedropper filling methods involve filling the pen’s body or a built-in reservoir with ink. These methods allow for larger ink capacities and an even broader range of ink choices. But they may require more maintenance and care.
With a little tweaking (and a healthy dose of silicone), you can turn many converter or cartridge pens into eyedroppers. I did it with my Jinhao Shark fountain pen, for example.
Learn the important bits of your fountain pen
Fountain pens are cool on the outside, but the inside is where the real magic happens.
It’s also where you’ll run into most of your potential problems.
So you want to get into the guts of your pen to see how it works. That way, it’s easier to diagnose potential problems and clean your fountain pen.
These are the key parts to know.
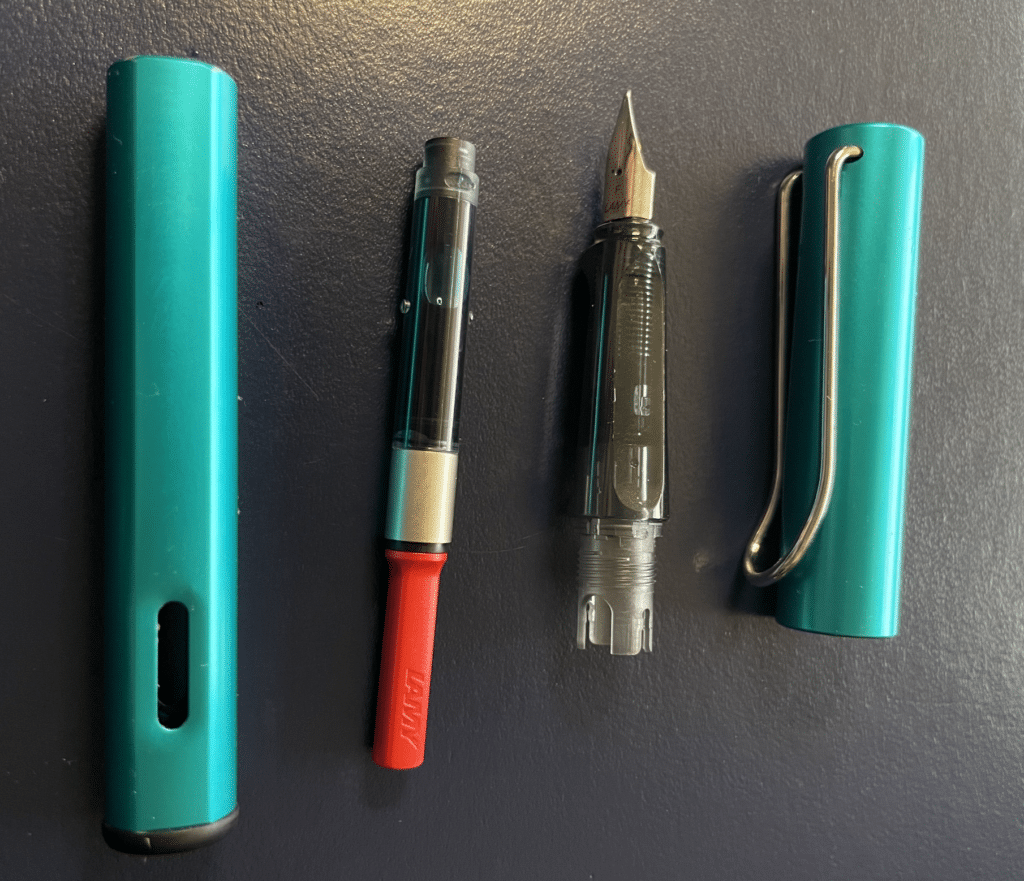
Nib
The nib is the star of the show — it’s the metal tip that glides across the paper and lets the ink flow. Nibs are made of gold, stainless steel, or even titanium. They come in all sorts of sizes and shapes, from extra fine to broad. Some pens have detachable nibs that you can swap out.
Feed
The feed is the part underneath the nib that makes sure the ink flows smoothly from the reservoir to the nib. It’s usually made of plastic or hard plastic (called ebonite in fancy fountain pen speak) and has a bunch of little channels that help control the ink flow.
Section
Now, let’s talk about the section—this is where you hold the pen. It connects the nib and feed to the rest of the pen and usually has a slight taper or curve for a comfortable grip. It’s important to know this part because when you clean your pen, you’ll need to unscrew the section to get to the nib and feed.
Reservoir
The reservoir is where the ink is stored. Depending on your pen type, it could be a built-in piston system, a converter, or a cartridge. This is the heart of your fountain pen, and keeping it clean is essential for a smooth writing experience.
We’ll get into the nitty-gritty of cleaning different types of reservoirs later. But first, let’s look at prepping for cleaning a fountain pen by setting up your workspace.
Download this cheatsheet and get expert solutions for the 13 most common pen problems.
Get The FREE CheatsheetPre-cleaning preparation: setting up your workspace
Before I got my own pens, I thought cleaning would be a nightmare.
But it’s pretty easy once you know the process.
And the first step in the process of getting your fountain pen clean is setting up a workspace. If you don’t, you run the risk of covering yourself, your clothes, or your couch cushion (I’ve heard that happens to people….) with ink.
Here’s how to do it.
Pick your spot
Start with a well-lit, flat surface near a sink or a place with easy access to water. You don’t want to be running back and forth between the pen and the water source.
Make sure the area is clutter-free so you have enough room to work. Also, avoid carpeted areas or anything lightly colored that could get stained.
As you get more comfortable, cleaning will become a breeze. Give yourself some extra leeway the first few times.
Gather your supplies
Cleaning a fountain pen is like baking. You want all your ingredients on hand and ready to go first. Don’t get started and then run around looking for other stuff.
- Small container for water. I use a clear 8oz deli container, but clean take-out containers can work too. Bowls and cups also work, just don’t forget the nib is in there!
- Lint-free cloth or paper towels. You’ll need these to clean off the pen and run your nib over. Ideally, you don’t want a bunch of fibers getting all up in your nib.
- Syringe. I have a flat-tipped syringe I use to help flush the pen out (it’s also great for re-filling ink cartridges).
- Soft cleaning brush or toothbrush (optional). I have a set of small travel brushes I got from the dollar store I use for random stuff like cleaning my white Air Force 1s and pen parts.
- Silicone grease (optional). If you have a piston pen, grease can help make the parts move smoothly. And if you want to convert your pen to an eyedropper, use an o-ring and silicone grease to do it.
- Pen flush (optional). Water — either tap or distilled — works really well to clean most pens, but if you have some stubborn gunk, try a pen flush. It basically has a small bit of ammonia in it. If you use pen flush, sandwich it with water first. So do water, then flush, then water again.
Protect your workspace
Lay down a few sheets of paper towels or an old, clean cloth to catch any ink spills and protect your work surface. It’ll also give you a spot to place your pen parts as you disassemble and clean them.
Keep it organized
As you take your pen apart, it’s helpful to lay the pieces out in the order you removed them. This will make reassembly much easier, especially if you’re new to the process.
A small dish or tray can come in handy to keep everything in one place and prevent any tiny parts from rolling away.
Enjoy the vibes
Grab a chair, put on your favorite tunes, and relax. Cleaning your fountain pen can be a therapeutic and enjoyable process when you’re not rushed or stressed.
Now that you’ve got your workspace ready, it’s time to roll up your sleeves and start cleaning.
Cleaning techniques for different types of fountain pens
Most of the process for cleaning a pen is the same regardless of the type of pen. But there are a few differences that matter. Here’s how to clean each of the most common pens.
How to clean a piston fountain pen
Piston-fill pens are cool because they have a built-in piston mechanism that draws ink directly into the pen’s reservoir.
But cleaning them can be a bit tricky, so let’s break it down into easy-to-follow steps.
Step 1: Separate the components
Unscrew the cap and set it aside. Carefully unscrew the nib section from the barrel. Gently pull the converter straight out from the nib section.
Hold it by the metal collar or flared plastic end, not the twisting knob, to avoid damaging the mechanism.
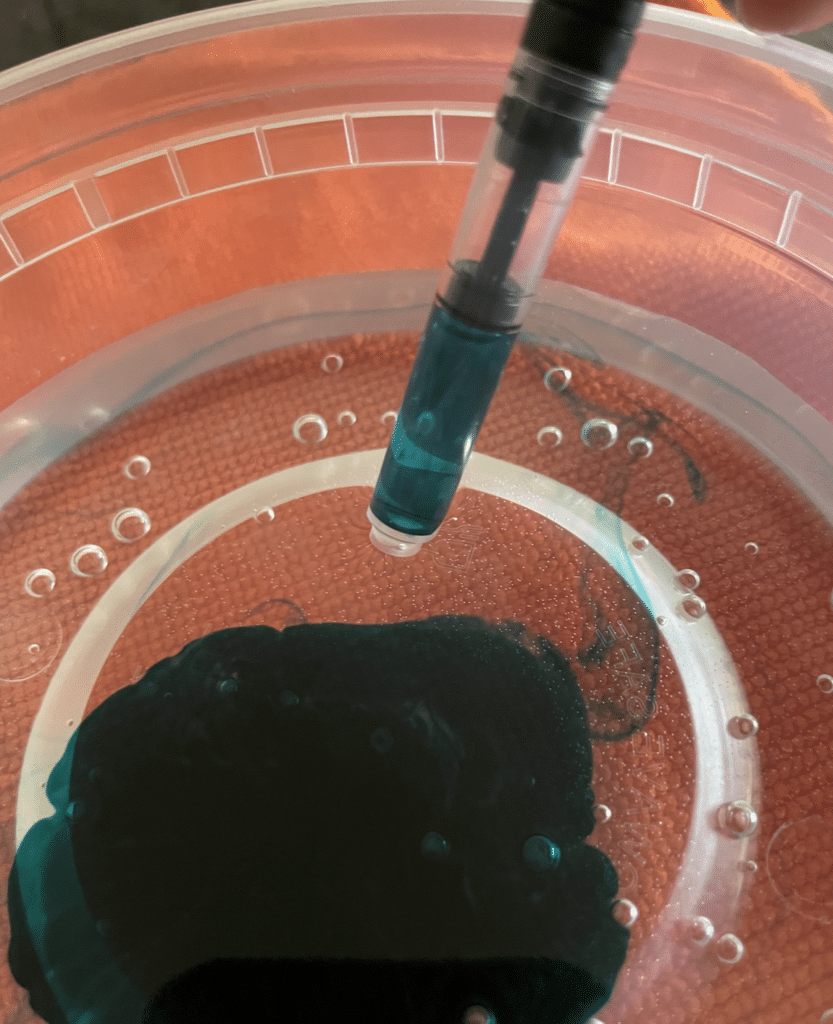
Step 2: Flush the converter
Fill a cup with cool or room temperature water (avoid hot water since it can damage the pen). Submerge the open end of the converter into the water.
Twist the converter knob counterclockwise to draw water into the converter. Expel the water by twisting the converter knob clockwise. Repeat the process until the water runs clear.
Give the converter a gentle shake to remove any excess water and set it aside to air dry.
Step 3: Nib and feed care
Submerge the nib in water. Use a syringe (optional but effective) to flush water through the nib and feed by placing the syringe over the opening where the converter was attached and gently squeezing. Or, you can draw water in and out of the nib section by repeatedly submerging and lifting it from the water.
Use a soft toothbrush or pen cleaning brush to gently scrub the nib and feed, removing any dried ink or debris. Rinse the nib section under running water to wash away any loosened particles.
Step 4: Drying
Gently shake off excess water from the nib section. Use a lint-free cloth or paper towel to pat the nib section and converter dry.
Leave the nib section and converter to air dry for a few hours or overnight.
Once everything is clean and dry, you can reassemble and refill it with ink.
How clean a converter fountain pen
Converter pens are super versatile because they can use both bottled ink and ink cartridges. But cleaning them requires a bit of extra care to ensure both the nib section and the converter are squeaky clean.
Most of the steps are the same as cleaning a piston pen.
Step 1: Separate the components
Start by unscrewing the cap and setting it aside. Carefully unscrew the nib section from the barrel.
Gently pull the converter straight out from the nib section. Avoid twisting or pushing the end of the converter so you don’t splash ink around.
Step 2: Flush the converter
Fill a cup with cool or room-temperature water. Submerge the open end of the converter in water.
Twist the converter knob counterclockwise to draw water in, and twist it in the opposite direction to flush it out. You can also use a syringe to suck out extra ink and flush with water.
Repeat the process until the water runs clear. Give the converter a gentle shake to remove any excess water and set it aside to air dry.
Step 3: Nib and feed care
Put the nib in your cup or bowl of room-temperature water. You can use a syringe to flush water through the nib. It’s optional but does make it a bit easier. Otherwise, dip the nib in and out of the water a bunch of times to help the water move through the parts.
If you have a toothbrush or cloth, gently scrub around the nib and feed, removing dried ink.
Then rinse the nib under running water (tap water is fine).
Step 4: Drying
I like to let my pen parts air dry. I’ll pat down the nib and converter to get the excess water. And then, place them both on a cloth or paper towel for a few hours or overnight.
Gently shake off excess water from the nib section. Use a lint-free cloth or paper towel to pat the nib section and converter dry. Leave the nib section and converter to air dry for a few hours or overnight.
After everything is clean and dry, reassemble. Refill your pen with ink, and you’re all set!
How to clean a cartridge fountain pen
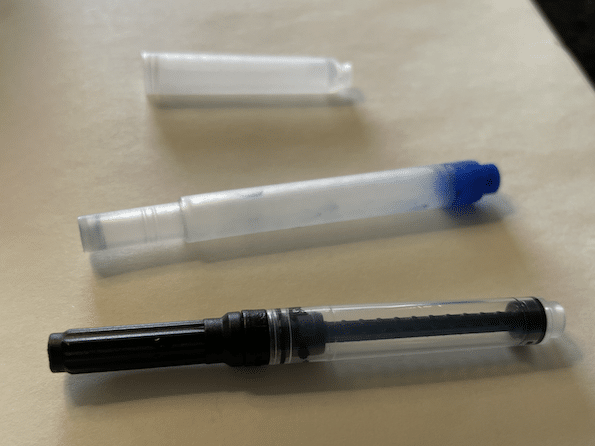
In the image above, the top two are ink cartridges (which you can refill), and the bottom is a converter.
Cartridge pens are super convenient because they use pre-filled ink cartridges, making them perfect for on-the-go writing.
Cleaning them is pretty similar to a converter pen, but can be quicker.
Step 1: Remove the cartridge
You know the drill by now. Unscrew the cap and then the nib section from the barrel.
Next, pull out the ink cartridge. It should snap right out.
If there’s still ink in the cartridge, be careful because it could drip out. I usually clean a cartridge pen once the ink is gone, but there may be a stray drop or two.
Step 2: Clean the nib unit and section
Just like with piston and converter pens, the main focus here is cleaning the nib. You’ll need your cup or bowl with room-temperature water. Submerge the nib unit and flush it with your syringe or running water.
Focus on flushing the pen from where the cartridge attaches to the nib since that area can see more ink build-up. I’ll place my syringe right over it and squirt water through it a few times.
Use your cloth or toothbrush to gently clean around the nib and feed. Then rinse it under running water — I try to aim for the water to be just very slightly lukewarm.
Step 3: Replace the fountain pen ink cartridge
If the cartridge still has ink, give it a little shake to make sure the ink is well mixed before putting it back in the pen.
If you’re switching to a new cartridge, gently squeeze the cartridge to release a small drop of ink before inserting it into the pen. It helps the ink flow a little more easily when you start writing.
You can also refill ink cartridges by squirting ink in them using your syringe. Make sure to mix it and squeeze it to get that little drop of ink out first.
Finally, insert the cartridge into the nib section. You’ll feel it click into place.
Step 4: Drying
Drying is the same as above. Shake off the water. Pat it down with a lint-free cloth or a paper towel and let dry for a few hours or overnight.
Congrats! You now know how to clean a fountain pen (in more ways than one).
Fountain pen cleaning pro tips
Keeping your fountain pen in tip-top shape is all about the little things. Even the most inexpensive pens can last years if you focus on cleaning them.
It’s just like keeping up a routine with your car and getting oil changes and new fluids. The more proactive you are, the better your car runs.
Here are a few expert tips to help you maintain your pen’s performance and keep it looking and feeling like new.
- Establish a cleaning routine. Cleaning your fountain pen regularly is essential for its longevity. Since I use converter pens, they don’t generally hold a lot of ink. So I may only take a month or two of writing to need a refill. That’s when I do my cleaning. If you haven’t used your pen for a while, give the pen a shake and the nib a gentle brush before using.
- Avoid tap water with high mineral content. High mineral content in tap water can lead to buildup and clogging in your pen. If you know your water is more mineraly (is that a word?), consider using distilled water or a standard filter like a Brita is fine too.
- Don’t over-tighten. Over-tightening the parts can cause unnecessary stress on the pen’s components and may lead to damage or leaks. The first time I made an eyedropper pen, I tightened it too hard, and it leaked. Gentle is always good with fountain pens. Finger-tight is usually sufficient.
- Store your pen properly. Proper storage is crucial for the longevity and performance of your pen. When not in use, store your pen capped and upright in a pen case or holder with the nib pointing up. This helps prevent ink from settling in the feed and causing clogs or hard starts.
- Embrace the “pen flush” for stubborn clogs. If your pen is experiencing stubborn clogs or flow issues, you might need a stronger cleaning solution. A pen flush is a mixture of water and a small amount of mild dish soap or ammonia (about a 1:10 ratio). Soak the nib section in the solution for a few hours, then flush with clean water.
Following these tips during your fountain pen cleaning routine can help you keep things flowing for a long time. I’ve had a couple of my pens for about 3-4 years with a lot of use and no issues.
Common fountain pen cleaning issues
Even with regular cleaning, fountain pens can sometimes act up.
But don’t worry — I’ve got you covered! Here are some solutions to common issues you might encounter while cleaning and maintaining your pen.
- Difficulty disassembling the pen. If your pen’s components are feeling a bit stubborn and hard to unscrew or separate, try using a rubber grip or gripper to get a better hold. If the parts still won’t budge, it’s best to consult the pen manufacturer or an expert for guidance.
- Ink flow problems after cleaning. If your pen is experiencing hard starts or skipping after a thorough clean, give it a gentle shake or tap to help get the ink flowing. You can also try squeezing the cartridge, converter, or piston to prime the feed. If the issue persists, double-check you’ve reassembled your pen correctly — your cartridge may not be clicked in place, for example.
- Clogged nibs and feeds. For stubborn clogs that won’t go away after a standard cleaning, try soaking the nib section in a pen flush solution (1:10 ratio of mild dish soap or ammonia to water) for a few hours before rinsing it thoroughly with clean water. Don’t use harsh chemicals; they can damage your pen.
- Leaky pens. If your pen is leaking ink from the nib or section, check that all the parts are assembled correctly and are finger-tight. If the issue continues, inspect the pen for any damage or cracks that could be causing the leak. In that case, the pen may need professional repair.
- Stained or discolored pens. Certain inks can stain or discolor the materials of your fountain pen, especially demonstrators or pens with clear parts. To minimize staining, avoid using highly saturated or pigmented inks, and clean your pen regularly. If your pen is already stained, try soaking the affected parts in water for a few hours or using a gentle pen cleaner specifically designed for pen materials.
With these troubleshooting tips, you’ll be well-equipped to overcome any cleaning hiccups and keep your fountain pen in pristine condition.
A clean fountain pen is a happy pen
Cleaning is a key part of fountain pen ownership. So make it a part of your process and you’ll enjoy your pens for years to come.

Liz
Hey, I'm Liz. I'm the founder of this thing. Pen-obsessed and a notebook nut, I love writing by hand. So I'm gonna talk about it on a computer.Download this cheatsheet and get expert solutions for the 13 most common pen problems.
Get The FREE Cheatsheet